引言
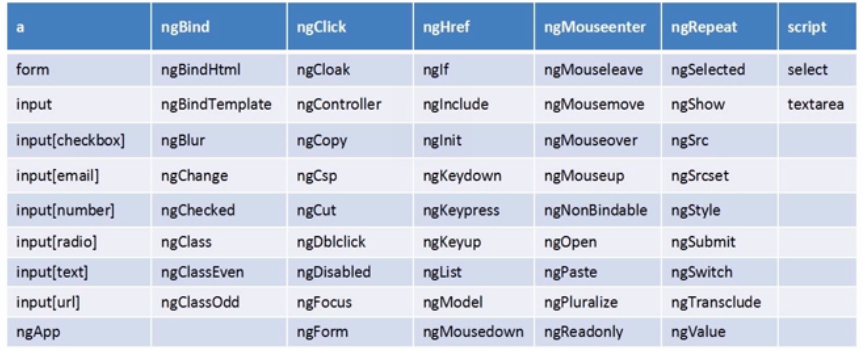
- angularjs有许多内置指令,这些指令主要用于操纵DOM、指定路由、绑定事件处理器、执行数据绑定等等;
- angularjs不仅有丰富的内置指令,而且可以自定义指令,实现自己需要的功能;
- angularjs指令系统是angularjs最重要的一个知识点,在本文中加以总结,如有不完善之处请您指出;
- 非常感谢慕课网的大漠穷秋老师,本文的很多代码复制自大漠穷秋老师在慕课网angularjs课程的示例代码;
内置指令
编写指令
- 最简单的指令模板如下:
1 | <!DOCTYPE html> |
1 | //test.js |
- 自定义指令参数
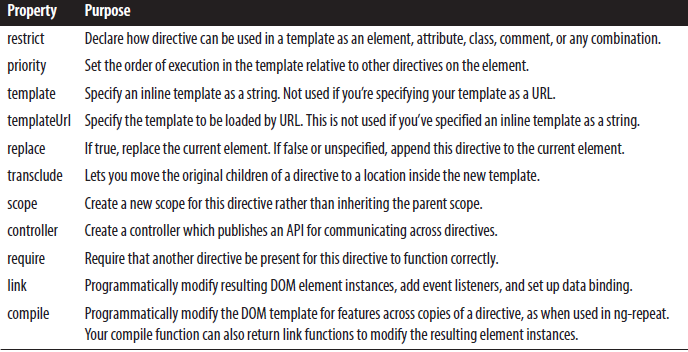
- 对自定义指令声明参数的说明:
- restrict:替换自定义元素类型,E(元素)、C(类)、A(属性)、M(注释);
- template:替换的模板,如
template: <div>this is a directive test.</div>; - templateURL: 替换的模板的URL,如
templateUrl: 'hello.html'; replace:true,将自定义标签的内容全部替换掉;transclude:true,自定义标签的内容不会被替换,而是被放置在template中的<div ng-transclude></div>中;compile: function(){...},自定义compile函数,一般放置暴露给外部看的(比如其他directive)一些公共函数;link: function(){...},自定义link函数,一般放置本directive中操纵DOM、添加事件监听器等的代码;- 作用域问题:在上述代码中,四个被指令替换的DOM标签其实所在的是同一个作用域,这样做不太安全,如果需要将作用域分开,则在指令中添加
scope:{}即可,下面会详细讲解;
独立scope
- 实现独立scope的方法是在指令中添加
scope:{}即可; - 代码如下,改动任意一个input标签的内容,其他的directive不受影响,即directive作用域独立:
1 | <!doctype html> |
1 | //IsolateScope.js |
指令和controller的交互
- 在link函数中完成简单的directive和controller的交互,下面程序实现了在link中添加事件监听器并调用controller的特定方法:
1 | <!DOCTYPE html> |
1 | //app.js |
- 一个指令也可同时调用多个controller的函数:
1 | <!DOCTYPE html> |
1 | //app.js |
指令间通信
- 指令间通信的方法是:
scope: {}定义独立作用域,controller暴露方法给别的指令,require引用其他指令;
1 | <!doctype html> |
1 | //Directive&Directive.js |
scope绑定
@绑定:将当前属性作为字符串传递,实现绑定;- 下面代码中,
flavor:'@'实现的功能可以由注释掉的link函数代替;
- 下面代码中,
1 | var myModule = angular.module("MyModule", []); |
=实现与父scope的属性双向绑定
1 | <!doctype html> |
1 | var myModule = angular.module("MyModule", []); |
&:传递一个父scope的函数,稍后调用
1 | <!doctype html> |
1 | var myModule = angular.module("MyModule", []); |
angularjs 初始化过程
- 理解angularjs的初始化过程有助于我们进一步理解link和compile函数;
- 初始化过程如下:
- ng-app寻找angular作用边界,在ng-app作用域范围内创建
$rootScope,以后各层级的$scope均在$rootScope基础上创建,实现树形作用域结构; - 解析module中的各种组件名称对应的回调函数的注册表,回调函数不被执行,注册表中的组件均可被用于依赖注入;
- controller立即执行;
- Compile:根据从服务器获取的或者dierective中的HTML模板编译HTML,对指定的模板进行转换,生成Linking函数,此时DOM是静态DOM;
- Link:将Compile结果与Scope结合,产生动态视图,包括在元素上注册时间监听,即动态DOM;
- 对于同一个指定的多个实例(如
ng-repeat),compile只会执行一次,而link对于指令的每个实例都会执行一次;
- ng-app寻找angular作用边界,在ng-app作用域范围内创建