Eric Chang's Blog


  • 首页

  • 归档

  • 分类

  • 标签

  • 生活

  • 关于

  • 搜索

Java HashMap的实现

发表于 2015-11-04 | 分类于 Java |

引言

  • Java中,HashMap是重要的数据结构;
  • HashMap用散列表实现,具体来说:
    • HashMap底层维护一个数组充当哈希表;
    • 当向HashMap中put一对键值时,它会根据key的hashCode值计算出一个位置,该位置就是此对象准备往数组中存放的位置,然后将key、value、next等值存放在Bucket中,作为Map.Entry;
    • 如果有哈希值的冲突,即两组数据要放在数组的同一个位置(bucket)中,则用链表实现;
    • 当从HashMap中get一个键值对时,HashMap会使用键对象的hashcode找到bucket位置,然后获取值对象;
    • 如果数组的同一个位置对应多个键值对,将会遍历LinkedList,并调用keys.equals()方法去找到LinkedList中正确的节点,最终找到要找的值对象;
  • 本文实现了一个简单的HashMap;

HashMap具体实现

  • Entry类,定义节点
1
2
3
4
5
6
7
8
9
10
11
12
13
14
15
16
17
18
19
20
21
22
23
24
25
26
27
28
29
30
31
32
package MyHashMap;

import java.util.Objects;

public class Entry<K, V> {
K k;
V v;
Entry<K, V> nextEntry = null;

// 构造器
public Entry(K k, V v) {
this.k = k;
this.v = v;
this.nextEntry = null;
}

public void setNextEntry(Entry<K, V> e) {
this.nextEntry = e;
}

public Entry<K, V> getNextEntry() {
return this.nextEntry;
}

public int hashCode() {
return Objects.hashCode(k) ^ Objects.hashCode(v);
}

public void display() {
System.out.println("key:" + k + " value:" + v);
}
}
  • MyHashMap类,实现HashMap大部分方法
1
2
3
4
5
6
7
8
9
10
11
12
13
14
15
16
17
18
19
20
21
22
23
24
25
26
27
28
29
30
31
32
33
34
35
36
37
38
39
40
41
42
43
44
45
46
47
48
49
50
51
52
53
54
55
56
57
58
59
60
61
62
63
64
65
66
67
68
69
70
71
72
73
74
75
76
77
78
79
80
81
82
83
84
85
86
87
88
89
90
91
92
93
94
95
96
97
98
99
100
101
102
103
104
105
106
107
108
109
110
111
112
113
114
115
116
117
118
119
120
121
122
123
124
125
126
127
128
129
130
131
132
133
134
135
136
137
138
139
140
141
142
143
144
145
146
147
148
149
150
151
152
153
154
155
156
157
158
159
160
161
162
163
164
165
package MyHashMap;

public class MyHashMap<K, V> {
public static final int DEFAULT_INITIAL_CAPACITY = 16;

protected Entry<K, V>[] entry = new Entry[DEFAULT_INITIAL_CAPACITY];
protected int size = 0; // 记录hashmap大小
protected int bucketSize = 0;

// 清空hashmap
public void clear() {
entry = new Entry[DEFAULT_INITIAL_CAPACITY];
size = 0;
}

// 检测数组大小
public void testSize() {
int length = entry.length;
if (bucketSize >= length / 2) {
Entry<K, V>[] newEntry = new Entry[length * 2];
System.arraycopy(entry, 0, newEntry, 0, length);
}
}

// 计算元素在数组中的位置
public static int indexFor(int h, int size) {
return h % (size - 1);
}

// 是否含有特定key
public boolean containsKey(K k) {
int index = indexFor(k.hashCode(), entry.length);
if(entry[index]!=null){
if(entry[index].k.equals(k)){
return true;
}else{
Entry<K,V> e = entry[index].nextEntry;
while(e!=null){
if(e.k.equals(k)){
return true;
}
}
}
}
return false;
}

// 是否包含特定value值
public boolean containsValue(V v) {
for (int i = 0; i < entry.length; i++) {
if (entry[i] != null) {
if (entry[i].v.equals(v)) {
return true;
} else {
if (entry[i].nextEntry != null) {
Entry<K, V> e = entry[i];
while (e != null) {
if (e.v.equals(v)) {
return true;
}
e = e.nextEntry;
}
} else {
continue;
}
}
}
}
return false;
}

// 获取特定key的value值
public V get(K k) {
int index = indexFor(k.hashCode(), entry.length);
if(entry[index]!=null){
if(entry[index].k.equals(k)){
return entry[index].v;
}else{
Entry<K,V> e = entry[index].nextEntry;
while(e!=null){
if(e.k.equals(k)){
return e.v;
}
}
}
}
return null;
}

// 插入数据
public void put(K k, V v) {
testSize();
int index = indexFor(k.hashCode(), entry.length); // 计算这个元素在数组中的位置

Entry<K, V> e = new Entry<K, V>(k, v);
if (entry[index] == null) {
entry[index] = e;
bucketSize++;
} else {
Entry<K, V> ee = entry[index];
ee.setNextEntry(e);
}
size++;
}

// 删除数据
public void remove(K k) {
int index = indexFor(k.hashCode(), entry.length);
if(entry[index]!=null){
Entry<K,V> e = entry[index];
if (e.nextEntry == null) {
if (e.k.equals(k)) {
entry[index] = null;
bucketSize--;
size--;
}
} else {
if (e.k.equals(k)) {
entry[index] = e.nextEntry;
size--;
} else {
Entry<K, V> previous = e;
Entry<K, V> current = e.nextEntry;
while (current != null) {
if (current.k.equals(k)) {
previous.nextEntry = current.nextEntry;
size--;
break;
}
previous = current;
current = current.getNextEntry();
}
}
}
}
}

// 判断是否为空
public boolean isEmpty() {
return size == 0;
}

// 获取长度
public int size() {
return size;
}

// 遍历输出
public void diaplayAll() {
for (int i = 0; i < entry.length; i++) {
if (entry[i] != null) {
if (entry[i].nextEntry != null) {
Entry<K, V> e = entry[i];
while (e != null) {
e.display();
e = e.nextEntry;
}
} else {
entry[i].display();
continue;
}
}
}
}
}
  • TestMyHashMap测试类
1
2
3
4
5
6
7
8
9
10
11
12
13
14
15
16
17
18
19
20
21
22
23
24
25
26
27
28
29
30
31
32
33
34
35
36
37
package MyHashMap;

public class TestMyHashMap {

public static void main(String[] args) {
MyHashMap<String, String> mhm = new MyHashMap<String, String>();
mhm.put("1", "111");
mhm.put("2", "222");
System.out.println(mhm.size()); //2
mhm.clear();
System.out.println(mhm.isEmpty()); //true
System.out.println("-------------");

mhm.put("1", "aaa");
mhm.put("6", "fff");
mhm.put("2", "bbb");
mhm.put("5", "eee");
mhm.put("4", "ddd");
mhm.put("3", "ccc");
System.out.println(mhm.size()); //6
mhm.remove("2");
System.out.println(mhm.size()); //5
System.out.println(mhm.containsKey("5")); //true
System.out.println(mhm.containsKey("2")); //false
System.out.println(mhm.containsKey("3")); //true
System.out.println(mhm.containsValue("ccc")); //true
System.out.println(mhm.containsValue("ggg")); //false
System.out.println(mhm.get("6")); //fff
System.out.println(mhm.get("5")); //eee
System.out.println(mhm.get("2")); //null
System.out.println(mhm.isEmpty()); //false
System.out.println("-------------");

mhm.diaplayAll();
}

}

Java HashMap的遍历

发表于 2015-11-04 | 分类于 Java |

引言

  • HashMap是java中非常重要的数据结构;
  • 本文提供了HashMap的若干种遍历方法,大体上分为两类:
    • 通过Map.Entry遍历;
    • 通过keyset遍历;

HashMap遍历方法汇总

1
2
3
4
5
6
7
8
9
10
11
12
13
14
15
16
17
18
19
20
21
22
23
24
25
26
27
28
29
30
31
32
33
34
35
36
37
38
39
40
41
42
43
44
45
46
47
48
49
50
51
52
53
54
55
56
package test5;

import java.util.HashMap;
import java.util.Iterator;
import java.util.Map;
import java.util.Map.Entry;
import java.util.Set;

public class MapTest {

public static void main(String[] args) {
Map<Integer, String> m = new HashMap<Integer, String>();
m.put(1, "aaa");
m.put(2, "bbb");
m.put(3, "ccc");
m.put(4, "ddd");
m.put(5, "eee");

// 遍历方法一
for (Map.Entry<Integer, String> entry : m.entrySet()) {
System.out.println("key:" + entry.getKey() + " value:"
+ entry.getValue());
}
System.out.println("----------");

// 遍历方法二
Iterator<Entry<Integer, String>> it = m.entrySet().iterator();
while (it.hasNext()) {
Map.Entry<Integer, String> entry = it.next();
System.out.println("key:" + entry.getKey() + " value:"
+ entry.getValue());
}
System.out.println("----------");

// 遍历方法三
Set<Integer> s = m.keySet();
Iterator<Integer> it1 = s.iterator();
while (it1.hasNext()) {
int i = it1.next();
System.out.println("key:" + i + " value:"
+ m.get(i));
}
System.out.println("----------");

//遍历方法四
for(int i : m.keySet()){
System.out.println("key:"+i+" value:"+m.get(i));
}
System.out.println("----------");

//遍历方法五 遍历所有的值 不能读取key
for(String value:m.values()){
System.out.println("value:"+value);
}
}
}

Java LinkedList的实现

发表于 2015-11-03 | 分类于 Java |

引言

  • Java中,LinkedList是重要的数据结构;
  • LinkedList用链表实现,每个节点不仅保存本节点的数据,还保存下个节点的引用;
  • 本文实现了一个简单的LinkedList;

LinkedList具体实现

  • Node类,定义节点
1
2
3
4
5
6
7
8
9
10
11
12
13
14
package linkedtest;

public class Node<T> {
protected Node<T> next;
protected T data;

public Node(T data) {
this.data = data;
}

public void display() {
System.out.println(data + " ");
}
}
  • MyLinkedList 具体实现类
1
2
3
4
5
6
7
8
9
10
11
12
13
14
15
16
17
18
19
20
21
22
23
24
25
26
27
28
29
30
31
32
33
34
35
36
37
38
39
40
41
42
43
44
45
46
47
48
49
50
51
52
53
54
55
56
57
58
59
60
61
62
63
64
65
66
67
68
69
70
71
72
73
74
75
76
77
78
79
80
81
82
83
84
85
86
87
88
89
90
91
92
93
94
95
96
97
98
99
100
101
102
103
104
105
106
107
108
109
110
111
112
113
114
115
116
117
118
119
120
121
122
123
124
125
126
127
128
129
130
131
132
133
134
135
136
137
138
139
140
141
142
143
144
145
146
147
148
149
150
151
152
153
154
155
156
157
158
159
160
161
162
163
164
165
166
167
168
169
170
171
172
173
174
175
176
177
178
179
180
181
182
183
184
185
186
187
188
189
190
191
192
193
194
195
196
197
198
199
200
201
202
203
204
205
206
207
208
209
210
211
212
213
214
215
216
217
218
219
220
221
222
package linkedtest;

public class MyLinkedList<T> {
protected Node<T> first; // 存储首元素
protected Node<T> last; // 存储末尾元素
protected int point = 0; // 存储当前指针
protected int size = 0; // 存储链表大小

// 构造器
public MyLinkedList() {

}

// 清空链表
public void clear() {
first = null;
last = null;
point = 0;
size = 0;
}

// 添加元素到末尾
public void add(T data) {
Node<T> node = new Node<T>(data);
if (size == 0) {
first = node;
first.next = null;
last = node;
last.next = null;
size++;
} else {
last.next = node;
last = node;
size++;
}
}

// 添加元素到特定位置
public void add(T data, int index) {
Node<T> node = new Node<T>(data);
point = 0;
Node<T> previous = first;
Node<T> current = first;
while (point != index) {
previous = current;
current = current.next;
point++;
}
previous.next = node;
node.next = current;
size++;
}

// 添加元素到list首部
public void addFirst(T data) {
Node<T> node = new Node<T>(data);
node.next = first;
first = node;
size++;
}

// 是否包含元素
public boolean contains(T data) {
point = 0;
Node<T> previous = first;
Node<T> current = first;
while (point < size) {
if (current.data.equals(data)) {
return true;
}
previous = current;
current = current.next;
point++;
}
return false;
}

// 获取特定位置元素
public T get(int index) {
if (index >= size) {
return null;
}

point = 0;
Node<T> previous = first;
Node<T> current = first;

while (point != index) {
previous = current;
current = current.next;
point++;
}
return current.data;
}

// 获取首元素
public T getFirst() {
return first.data;
}

// 获取尾元素
public T getLast() {
return last.data;
}

// 获取元素位置
public int indexOf(T data) {
point = 0;
Node<T> previous = first;
Node<T> current = first;
while (point < size) {
if (current.data.equals(data)) {
return point;
}
previous = current;
current = current.next;
point++;
}
return -1;
}

// 反向获取元素位置
public int lastIndexOf(T data) {
int size1 = size;
int point1 = 0;
while (size1 > 0) {
Node<T> previous = first;
Node<T> current = first;
while (point1 < size1 - 1) {
previous = current;
current = current.next;
point1++;
}
if (current.data.equals(data)) {
return size1 - 1;
} else {
size1--;
point1 = 0;
}
}
return -1;
}

// 删除特定位置元素
public void remove(int index) {
point = 0;
Node<T> previous = first;
Node<T> current = first;
while (point < size) {
if (point == index) {
previous.next = current.next;
break;
}
previous = current;
current = current.next;
point++;
}
size--;
}

// 删除特定元素
public void remove(T data) {
point = 0;
Node<T> previous = first;
Node<T> current = first;
while (point < size) {
if (current.data.equals(data)) {
previous.next = current.next;
break;
}
previous = current;
current = current.next;
point++;
}
size--;
}

// 删除第一个元素
public void removeFirst() {
first = first.next;
size--;
}

// 删除最后一个元素
public void removeLast() {
point = 0;
Node<T> previous = first;
Node<T> current = first;
while (point < size) {
previous = current;
current = current.next;
if (point == size - 1) {
last = previous;
last.next = null;
break;
}
point++;
}
size--;
}

// 是否为空
public boolean isEmpty() {
return size == 0;
}

//返回list大小
public int size(){
return size;
}

//遍历输出list
public void displayAll(){
point = 0;
Node<T> node = first;
while(point<size){
node.display();
node = node.next;
point++;
}
}
}
  • TestMyLinkedList 测试类
1
2
3
4
5
6
7
8
9
10
11
12
13
14
15
16
17
18
19
20
21
22
23
24
25
26
27
28
29
30
31
32
33
34
35
36
37
38
39
40
41
42
43
44
45
46
47
48
49
50
51
52
53
54
55
56
57
58
59
60
package linkedtest;

public class TestMyLinkedList {

public static void main(String[] args) {
MyLinkedList<String> mlist = new MyLinkedList<String>();

mlist.add("111");
mlist.add("222");
mlist.displayAll();
System.out.println("------------");

mlist.clear();
mlist.add("aaa");
mlist.add("bbb");
mlist.add("ddd");
mlist.add("ccc");
mlist.add("aaa");
mlist.add("eee");
mlist.displayAll();
System.out.println("------------");

mlist.add("sss", 3);
mlist.displayAll();
System.out.println("------------");

mlist.addFirst("000");
mlist.displayAll();
System.out.println(mlist.size()); //8
System.out.println("------------");

System.out.println(mlist.contains("bbb")); //true
System.out.println(mlist.get(0)); //000
System.out.println(mlist.get(1)); //aaa
System.out.println(mlist.get(5)); //ccc
System.out.println(mlist.get(8)); //null
System.out.println(mlist.getFirst()); //000
System.out.println(mlist.getLast()); //eee
System.out.println(mlist.indexOf("sss")); //4
System.out.println(mlist.indexOf("aaa")); //1
System.out.println(mlist.lastIndexOf("aaa")); //6
System.out.println("------------");

mlist.remove(2);
System.out.println(mlist.size());
mlist.remove("ddd");
System.out.println(mlist.size());
mlist.displayAll();
System.out.println("------------");

mlist.removeFirst();
mlist.removeLast();
mlist.displayAll();
System.out.println("------------");

System.out.println(mlist.isEmpty()); //false
System.out.println(mlist.size()); //4
}

}

Java ArrayList的实现

发表于 2015-11-03 | 分类于 Java |

引言

  • Java中,ArrayList是重要的数据结构;
  • ArrayList用数组实现;
  • 本文实现了一个简单的ArrayList;

具体实现

  • MyArrayList 完成大部分方法实现
1
2
3
4
5
6
7
8
9
10
11
12
13
14
15
16
17
18
19
20
21
22
23
24
25
26
27
28
29
30
31
32
33
34
35
36
37
38
39
40
41
42
43
44
45
46
47
48
49
50
51
52
53
54
55
56
57
58
59
60
61
62
63
64
65
66
67
68
69
70
71
72
73
74
75
76
77
78
79
80
81
82
83
84
85
86
87
88
89
90
91
92
93
94
95
96
97
98
99
100
101
102
103
104
105
106
107
108
109
110
111
112
113
114
115
116
117
118
119
120
121
122
123
124
125
126
127
128
129
130
131
132
133
134
135
136
package arraylisttest;

public class MyArrayList<T> {
public static final int initialSize = 16;
Object[] array = new Object[initialSize];
T[] myArray = (T[]) array;

int size = 0; // 数组长度

// 构造器
public MyArrayList() {

}

// 删除全部元素
public void clear() {
array = new Object[initialSize];
myArray = (T[]) array;
size = 0;
}

// 检测数组空间是否充足
public void ensureCapacity() {
if (size > (int) (myArray.length / 2)) {
Object[] newArray = new Object[array.length * 2];
T[] newMyArray = (T[]) newArray;
System.arraycopy(array, 0, newMyArray, 0, myArray.length);
myArray = newMyArray; // 新数组的引用赋值给原数组变量名,原数组的堆中的存储空间失去引用,交给垃圾回收处理
}
}

// 在末尾增加元素
public void add(T data) {
ensureCapacity();
myArray[size] = data;
size++;
}

// 在特定位置增加元素
public void add(T data, int index) {
ensureCapacity();
T temp = null;
for (int i = index; i < myArray.length; i++) {
temp = myArray[i];
myArray[i] = data;
data = temp;
}
size++;
}

// 检测是否存在元素
public boolean contains(T data) {
for (int i = 0; i < size; i++) {
if (myArray[i].equals(data)) {
return true;
}
}
return false;
}

// 获取特定元素
public T get(int index) {
return myArray[index];
}

// 获取特定元素的索引值
public int indexOf(T data) {
for (int i = 0; i < size; i++) {
if (myArray[i].equals(data)) {
return i;
}
}
return -1;
}

//获取元素最后一次出现的索引值
public int lastIndexOf(T data){
int index = 0;
for(int i = 0; i < size; i++){
if (myArray[i].equals(data)) {
index = i;
}
}
return index;
}

// 判断是否为空
public boolean isEmpty() {
return size == 0;
}

// 移除特定索引的元素
public void remove(int index){
if(index<size){
for(int i =index+1; i<size; i++){
myArray[i-1]=myArray[i];
}
}
size--;
}

//移除特定元素
public void remove(T data){
int index = 0;
boolean match = false;
for(int i =0; i<size; i++){
if(myArray[i].equals(data)){
index = i;
match = true;
break;
}
}

if(!match){
for(int i =index+1; i<size; i++){
myArray[i-1]=myArray[i];
}
}
size--;
}

//替换对应元素
public void set(T data, int index){
if(index<size){
myArray[index] = data;
}
}

//显示全部元素
public void displayAll(){
for(int i =0; i<size; i++){
System.out.print(myArray[i]+" ");
}
System.out.print("\n");
}
}
  • MyArrayListTest 测试类
1
2
3
4
5
6
7
8
9
10
11
12
13
14
15
16
17
18
19
20
21
22
23
24
25
26
27
28
29
30
31
32
33
34
35
36
37
38
39
40
41
42
43
44
package arraylisttest;

public class MyArrayListTest {

public static void main(String[] args) {
MyArrayList<String> list = new MyArrayList<String>();

list.add("111");
list.add("222");
list.add("333");
list.displayAll();
list.add("test", 1);
list.displayAll();
list.clear();
System.out.println(list.isEmpty()); //true
System.out.println("----------");

list.add("aaa");
list.add("bbb");
list.add("aaa");
list.add("ccc");
list.add("eee");
list.add("ddd");
System.out.println(list.contains("ccc")); //true
System.out.println(list.contains("sss")); //false
System.out.println(list.get(2)); //aaa
System.out.println(list.indexOf("aaa")); //0
System.out.println(list.lastIndexOf("aaa")); //2
System.out.println(list.indexOf("ddd")); //5
System.out.println(list.isEmpty()); //false
System.out.println("----------");

list.displayAll();
list.remove(1);
list.remove("ddd");
list.displayAll();
System.out.println("----------");

list.set("bbb",1);
list.displayAll();
System.out.println("----------");
}

}

javascript字符串操作

发表于 2015-11-02 | 分类于 Web |

引言

  • 字符串操作是js中常见的操作;
  • 本文总结了js中常见的字符串操作;

常见字符串操作

1
2
3
4
5
6
7
8
9
10
11
12
13
14
15
16
17
18
19
20
21
22
23
24
25
26
27
28
29
30
31
32
33
34
35
36
37
38
39
40
41
42
43
44
45
46
47
48
49
50
51
52
53
54
55
56
57
var str1 = "aaa";
var str2 = "bbb";
var str3 = "ccc";
var str4 = "aaabbbccc";
var str5="Hello world!"

//字符串长度
document.write(str1.length +"<br>")

//大小写转换
document.write(str5.toLowerCase() +"<br>") //hello world!
document.write(str5.toUpperCase() +"<br>") //HELLO WORLD!

//连接两个字符串
document.write(str1.concat(str2) +"<br>") //aaabbb

//返回字符串中一个子串第一处出现的索引。如果没有匹配项,返回 -1
document.write(str4.indexOf("b") +"<br>") // 3
document.write(str4.indexOf("c") +"<br>") // 6
document.write(str4.indexOf("ab") +"<br>") // 2

//返回字符串中一个子串最后一处出现的索引,如果没有匹配项,返回 -1
document.write(str4.lastIndexOf("b") +"<br>") // 5

//返回指定位置的字符
document.write(str4.charAt(2) +"<br>") // a
document.write(str4.charAt(7) +"<br>") // c

//使用 match() 来检索一个字符串
document.write(str5.match("world") + "<br />") // world
document.write(str5.match("World") + "<br />") // null
document.write(str5.match("worlld") + "<br />") // null
document.write(str5.match("world!") + "<br />") // world!

//使用 match() 来检索一个正则表达式的匹配
document.write(str4.match(/a*b/) + "<br />") // aaab

//返回字符串的一个子串,传入参数是起始位置和结束位置
document.write(str4.substring(0,5) + "<br />") //aaabb

//slice() 方法可提取字符串的某个部分,并以新的字符串返回被提取的部分
//stringObject.slice(start,end)
document.write(str4.slice(1,4) + "<br />") // aab

//替换部分字符串,stringObject.replace(regexp/substr,replacement)
document.write(str4.replace("aaab","ccc") + "<br />") //cccbbccc
document.write(str4.replace(/a*b/,"ccc") + "<br />") //cccbbccc

//search() 方法用于检索字符串中指定的子字符串,或检索与正则表达式相匹配的子字符串
//stringObject.search(regexp)
document.write(str4.search(/a*b/) + "<br />") // 0
document.write(str4.search(/b*c/) + "<br />") // 3
document.write(str4.search(/.*d/) + "<br />") // -1(无匹配)

//通过将字符串划分成子串,将一个字符串做成一个字符串数组
document.write(str5.split(" ")[0] + "<br />") //Hello
document.write(str5.split(" ")[1] + "<br />") //world!

Java堆内存和栈内存

发表于 2015-10-31 | 分类于 Java |

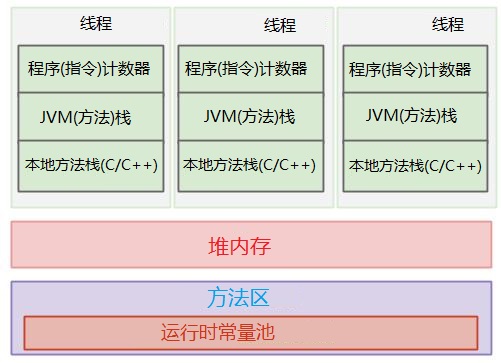
JVM运行时数据区

jvm

  • 程序计数器:存放线程执行位置(main函数也是一个线程);
  • 虚拟机栈(栈内存):
    • 生命周期和对应的线程相同,存放该线程的局部变量、对象的引用;
    • 方法中可能嵌套调用别的方法,这些方法的变量以”先进后出、后进先出“的方式在栈内存中存储,所以内层方法无法访问外层方法的变量(他们在栈底),执行外层方法时内层方法的变量已经弹出栈消失了,所以外层方法也不会访问到内层方法的变量;
    • 一个方法的执行过程,就是这个方法对于帧栈的入栈出栈过程;
  • 本地方法栈:
    • 作用和虚拟机栈完全相同;
    • 虚拟机栈对应普通的java方法,本地方法栈对应native方法;
    • native方法是一个java调用非java代码的接口;
  • 方法区:
    • JVM内存管理中最大一块;
    • 存储常量(final修饰)、类变量/成员变量(static修饰)、类信息(每个类的访问控制符、修饰符、继承关系等);
  • 堆内存:JVM启动时创建,存放对象本身,不存放对对象的引用(引用存在栈内存);

堆内存和栈内存的区别

  • 变量存在栈内存中(无论是static类变量还是对象的变量),已经不在其作用域中的对象要及时弹出栈;
  • new出来的对象或实例,它的名称存在栈内存中,实体存在堆内存中,名称通过实体在堆内存的地址引用实体;
  • 垃圾回收的目标是堆内存中失去引用的对象实体;
  • 栈内存一般是用物理一级缓存实现,堆内存一般是用物理二级缓存实现,栈内存存取速度快于堆内存,代码本身存储在磁盘中,和堆栈内存无关;
  • 堆主要用来存放对象的,栈主要是用来执行程序的;
  • 每个线程有自己的栈内存(栈内存是线程私有的),在一个JVM实例中(一个java应用对应一个JVM实例),堆内存只有一个(堆内存是线程共享的);
  • 在java中:
    • 基本数据类型(int, short, long, byte, float, double, boolean, char),他们存储在栈内存中,函数调用它们的时候是”传值”;
    • 复杂数据类型(数组, 对象, map, List, Set等),他们的实体存储在堆内存中,栈内存中只存储他们的对象的名称、通过堆内存的地址引用实体对象,函数调用它们的时候是”传引用地址”;

同源策略详解

发表于 2015-10-30 | 分类于 Web |

什么是同源策略

  • 同源策略是Netscape提出的一个著名的安全策略;
  • 同源策略是浏览器最核心最基础的安全策略;
  • 现在所有的可支持javascript的浏览器都会使用这个策略;
  • web构建在同源策略基础之上,浏览器对非同源脚本的限制措施是对同源策略的具体实现;
  • 本文详细说明了同源策略的含义,用具体的例子让您深入理解同源策略,并且对跨域访问的几种常用机制作了说明;

同源策略的含义详解

  • 含义一(DOM层面的同源策略):
    • 限制了来自不同源的”document”对象或js脚本,对当前“document”对象的读取或设置某些属性;
  • 含义二(Cookie和XMLHttprequest层面的同源策略):
    • 只有和本网页同源的脚本才会被执行,有时,AJAX已经加载不同源的脚本,但绝对不会被执行;
  • 含义三(同源策略的非绝对性):
    • 同源策略通常允许进行跨域写操作、通常允许跨域资源嵌入、通常不允许跨域读操作;
    • <script><img><iframe><link><video><audio>等带有src属性的标签可以从不同的域加载和执行资源,同源策略关注的是加载js的页面所在的域,而不是页面内存放的js文件的域;
  • 含义四(其他插件的同源策略):
    • flash、java applet、silverlight、googlegears等浏览器加载的第三方插件也有各自的同源策略,只是这些同源策略不属于浏览器原生的同源策略,如果有漏洞则可能被黑客利用,从而留下XSS攻击的后患;

几个同源策略常见问题

  • 没有同源策略会怎样?为什么同源策略禁止跨域读操作?

    • 设想你打开了一个银行网站,又打开了一个恶意网站,如果没有同源策略,将会:
    • 恶意网站包含了脚本a.js,银行网站在没有加载此脚本的情况下,就可以被此脚本操纵,操纵的后果是:
    • 银行网站页面DOM结构被篡改;
    • 银行网站页面DOM元素的属性和值被篡改;
    • 银行页面发送的表单信息可能被恶意脚本接收到,造成用户名密码泄漏;
    • 恶意网站通过自己加载的恶意js脚本获取了银行网站用户的cookie信息,并将它发送给了银行网站,随后,恶意网站就可以自动的、不受用户限制的、在用户不知情的情况下登录用户的银行网站并且伪装用户发送转账等请求;
  • 有了同源策略会怎样?

    • 浏览器在执行一个js脚本(或其他脚本)前,需要对这个脚本进行同源检测,如果加载这个脚本的页面和当前页面不同源,浏览器将拒绝执行此脚本;
    • 注意,浏览器并不关心js脚本来自何方(不关心js脚本从哪个域名、哪个”源”加载),它只关心加载脚本的那个页面是否和当前页面同源;
  • 为什么<script><img><iframe><link><video><audio>等带有src属性的标签可以不遵守同源策略/为什么同源策略允许跨域嵌入:

    • 现在很多大型网站的js脚本、图片等都不是存放在存储网站页面的那台服务器上,他们很可能通过CDN等方式传送到浏览器端,如果限制他们必须和网站页面同源,无异于自己束缚手脚;
    • 一个网站要加载哪些脚本,由网站的编写人员说了算,他们不会故意加载恶意脚本(比如银行网站的编写人员不会将恶意网站的脚本写在银行网站中),所以只要是写在网页中的脚本,我们认为它是安全的;
    • 所以,a.com的网页中可以写<script src="b.js"></script>,a网站加载了b网站的脚本,这是完全可以的,不受任何限制;
      可以这样认为,只要是页面加载的脚本,都和页面同源,无论这个脚本来自哪个”源”(source);
  • 为什么同源策略允许跨域写操作?

    • 和上面一条理解相同;
    • 比如提交表单这个写操作,表单不一定提交到提供网页页面的网站,很有可能提交到专门处理表单的服务器,如果不允许跨域写,将是很不灵活的;
    • 表单提交到什么地方,是编写页面时程序员决定,程序员不可能故意写一个恶意域名进去,所以写操作通常是安全的;
  • “同源”的具体含义?

    • 网站的同源:域名、协议、端口有一个不同就不是同源,三者均相同,这两个网站才是同源;
    • js脚本的同源:处于同源网站上的js脚本同源,否则不同源;
  • 浏览器沙箱机制:

    • 纵向上,浏览器的不同标签页分属不同的进程,进程间不能相互访问内存;
    • 横向上,浏览器进程、渲染进程、插件进程、扩展进程相互隔离,他们可以相互通信,但要经过严格的安全检测;
    • 浏览器的沙箱机制是从内存管理的角度设计的安全措施,是对同源策略的补充,进一步提升浏览器安全性;

几种跨域访问策略和原理

  • document.domain

    • 浏览器在检测是否同源时肯定要检测域名是否相同,它是通过document.domain属性来获取当前页面域名的;
    • document.domain属性不能随便更改,但可以通过js将document.domain属性设置为当前document.domain属性值的后缀;
    • 例如,假设在 http://store.company.com/dir/other.html中的一个脚本执行了下列语句document.domain = "company.com",这条语句执行之后,浏览器将会成功地通过对http://company.com/dir/page.html的同源检测,但不能设置 document.domain为othercompany.com.;
    • 如果需要跨域访问的网站和本网站端口、协议均相同,只有域名不同,而且需要跨域访问的网站的域名是本网站的后缀,则可以使用document.domain暂时更改当前document对象的域名值,实现跨域访问;
    • 此种跨域访问限制颇多,空间上,只能跨域访问协议、端口相同的且域名是本网站后缀的网站,时间上,一旦原网站重新刷新页面,document.domain值恢复原状,不能继续跨域访问,所以这种跨域访问策略只能算是局部的、暂时的、基础域名相同的网站间的跨域访问;
  • window.name

    • 浏览器一个窗口(标签页)的window.name属性在时间上是全局的,无论一个窗口中的页面如何跳转,window.name属性不变;
    • 可以看到,如果在一个标签里面跳转网页的话,我们的 window.name 是不会改变的;
    • 由于安全原因,浏览器始终会保持 window.name 是string类型;
    • window.name比document.domain更强大,可以从任意页面获取string类型的数据;
  • JSONP

    • JSONP是一种依靠开发人员的聪明才智创造出的一种非官方跨域数据交互协议;
    • JSONP本质是利用了<script><img><iframe>等标签可跨预加载脚本的特性实现数据跨域传输;
    • 本地的js代码将需要请求的数据包装好(如需要某天的某次航班的飞机票数据),发送到远端js,远端js依据本地js提供的信息获取相应的数据传回到本地js;
    • JSONP 的理念就是,我和服务端约定好一个函数名,当我请求文件的时候,服务端返回一段 JavaScript,这段 JavaScript 调用了我们约定好的函数,并且将数据当做参数传入;
  • postMessage

    • postMessage()方法允许来自不同源的脚本(无视协议,端口,域名的不同)采用异步方式进行有限的通信,可以实现跨文本档、多窗口、跨域消息传递;
    • postMessage(data,origin)方法接受两个参数:
    • data:要传递的数据,html5规范中提到该参数可以是JavaScript的任意基本类型或可复制的对象,然而并不是所有浏览器都做到了这点儿,部分浏览器只能处理字符串参数,所以我们在传递参数的时候需要使用JSON.stringify()方法对对象参数序列化,在低版本IE中引用json2.js可以实现类似效果;
    • origin:字符串参数,指明目标窗口的源,协议+主机+端口号[+URL],URL会被忽略,所以可以不写,这个参数是为了安全考虑,postMessage()方法只会将message传递给指定窗口,当然如果愿意也可以建参数设置为”*”,这样可以传递给任意窗口,如果要指定和当前窗口同源的话设置为”/“;
  • 对于跨域访问的说明:

    • 对于不同的浏览器、不同的业务类型、不同的安全等级、不同的实际情况,对下述内容的管制也不相同,有的允许有的禁止:跨域写、跨域嵌入、跨域读、跨域API接口访问、跨域数据存储(DB)访问、跨域授权情况;
    • 其他的跨域访问机制:CORS(允许一个域上的网络应用向另一个域提交跨域AJAX请求)、OAuth(跨域授权);
    • 严格的同源策略限制所有的跨域读写、跨域访问和跨域资源嵌入,虽然保证了安全性,但是对于大型网站来说,强迫他们把一个网站的所有功能放在一个域名下,降低了效率和网站的可扩展性;
    • 所以现有的同源策略、跨域访问策略是在效率和安全性之间做出的最佳权衡;

java 文件压缩和解压

发表于 2015-10-28 | 分类于 Java |

引言

  • 文件压缩和解压是常见的操作
  • 本文重点总结了java中文件压缩和解压的方法

方法一

  • zip格式,不支持中文
  • 压缩:
1
2
3
4
5
6
7
8
9
10
11
12
13
14
15
16
17
18
19
20
21
22
23
24
25
26
27
28
29
30
31
32
33
34
35
36
37
38
import java.io.FileInputStream;
import java.io.FileOutputStream;
import java.io.IOException;
import java.util.zip.ZipEntry;
import java.util.zip.ZipOutputStream;

public class App
{

public static void main( String[] args )
{
byte[] buffer = new byte[1024];

try{

FileOutputStream fos = new FileOutputStream("C:\\MyFile.zip");
ZipOutputStream zos = new ZipOutputStream(fos);
ZipEntry ze= new ZipEntry("spy.log");
zos.putNextEntry(ze);
FileInputStream in = new FileInputStream("C:\\spy.log");

int len;
while ((len = in.read(buffer)) > 0) {
zos.write(buffer, 0, len);
}

in.close();
zos.closeEntry();

//remember close it
zos.close();

System.out.println("Done");

}catch(IOException ex){
ex.printStackTrace();
}
}
}
  • 解压
1
2
3
4
5
6
7
8
9
10
11
12
13
14
15
16
17
18
19
20
21
22
23
24
25
26
27
28
29
30
31
32
33
34
35
36
37
38
39
40
41
42
43
44
45
46
47
48
49
50
51
52
53
54
55
56
57
58
59
60
61
62
63
64
65
66
67
68
69
70
71
72
73
74
75
import java.io.File;
import java.io.FileInputStream;
import java.io.FileOutputStream;
import java.io.IOException;
import java.util.List;
import java.util.zip.ZipEntry;
import java.util.zip.ZipInputStream;

public class UnZip
{
List<String> fileList;
private static final String INPUT_ZIP_FILE = "C:\\MyFile.zip";
private static final String OUTPUT_FOLDER = "C:\\outputzip";

public static void main( String[] args )
{
UnZip unZip = new UnZip();
unZip.unZipIt(INPUT_ZIP_FILE,OUTPUT_FOLDER);
}

/**
* Unzip it
* @param zipFile input zip file
* @param output zip file output folder
*/

public void unZipIt(String zipFile, String outputFolder){

byte[] buffer = new byte[1024];

try{

//create output directory is not exists
File folder = new File(OUTPUT_FOLDER);
if(!folder.exists()){
folder.mkdir();
}

//get the zip file content
ZipInputStream zis =
new ZipInputStream(new FileInputStream(zipFile));
//get the zipped file list entry
ZipEntry ze = zis.getNextEntry();

while(ze!=null){

String fileName = ze.getName();
File newFile = new File(outputFolder + File.separator + fileName);

System.out.println("file unzip : "+ newFile.getAbsoluteFile());

//create all non exists folders
//else you will hit FileNotFoundException for compressed folder
new File(newFile.getParent()).mkdirs();

FileOutputStream fos = new FileOutputStream(newFile);

int len;
while ((len = zis.read(buffer)) > 0) {
fos.write(buffer, 0, len);
}

fos.close();
ze = zis.getNextEntry();
}

zis.closeEntry();
zis.close();

System.out.println("Done");

}catch(IOException ex){
ex.printStackTrace();
}
}
}

方法二

  • GBK编码,支持中文,zip格式
  • 压缩
1
2
3
4
5
6
7
8
9
10
11
12
13
14
15
16
17
18
19
20
21
22
23
24
25
26
27
28
29
30
31
32
33
34
35
36
37
38
39
40
41
42
43
44
import java.io.File; 
import java.io.FileInputStream;
import java.io.FileOutputStream;
import java.io.IOException;
import java.io.InputStream;
import java.nio.charset.Charset;
import java.util.zip.ZipEntry;
import java.util.zip.ZipOutputStream;

public class zip {

public static void main(String args[]) throws IOException {
File inFile = new File("D:\\test.txt");
ZipOutputStream zos = new ZipOutputStream(new FileOutputStream("D:\\test.zip"), Charset.forName("GBK"));

zos.setComment("ziped by Ming Cheng.");
zipFile(inFile, zos, "");
zos.close();
}

public static void zipFile(File inFile, ZipOutputStream zos, String dir) throws IOException {
if (inFile.isDirectory()) {
File[] files = inFile.listFiles();
for (File file:files)
zipFile(file, zos, dir + "\\" + inFile.getName());
} else {
String entryName = null;
if (!"".equals(dir))
entryName = dir + "\\" + inFile.getName();
else
entryName = inFile.getName();

ZipEntry entry = new ZipEntry(entryName);
zos.putNextEntry(entry);

InputStream is = new FileInputStream(inFile);
int len = 0;
while ((len = is.read()) != -1)
zos.write(len);

is.close();
}
}
}
  • 解压
1
2
3
4
5
6
7
8
9
10
11
12
13
14
15
16
17
18
19
20
21
22
23
24
25
26
27
28
29
30
31
32
33
34
35
36
37
38
39
40
41
42
43
44
45
46
import java.io.File; 
import java.io.FileInputStream;
import java.io.FileOutputStream;
import java.io.IOException;
import java.io.InputStream;
import java.io.OutputStream;
import java.nio.charset.Charset;
import java.util.zip.ZipEntry;
import java.util.zip.ZipFile;
import java.util.zip.ZipInputStream;

public class Unzip {

public static void main(String args[]) throws IOException {
File file = new File("D:\\test.zip");
ZipFile zipFile = new ZipFile(file, Charset.forName("GBK"));

ZipInputStream zipInputStream = new ZipInputStream(new FileInputStream(file), Charset.forName("GBK"));
unpack(zipFile, zipInputStream);
}

public static void unpack(ZipFile zipFile, ZipInputStream zipInputStream) throws IOException {

ZipEntry zipEntry = null;
while ((zipEntry = zipInputStream.getNextEntry()) != null) {
String fileName = zipEntry.getName();
File temp = new File("D:\\Test\\" + fileName);

if (! temp.getParentFile().exists())
temp.getParentFile().mkdirs();

OutputStream os = new FileOutputStream(temp);
InputStream is = zipFile.getInputStream(zipEntry);

int len = 0;
System.out.println(zipEntry.getName());

while ((len = is.read()) != -1)
os.write(len);

os.close();
is.close();
}
zipInputStream.close();
}
}

javascript 数学函数汇总

发表于 2015-10-27 | 分类于 Web |

引言

  • javascript中数学函数十分强大,能够帮助我们完成大多数常用的数学计算任务;
  • 本文汇总了这些常用的数学函数;

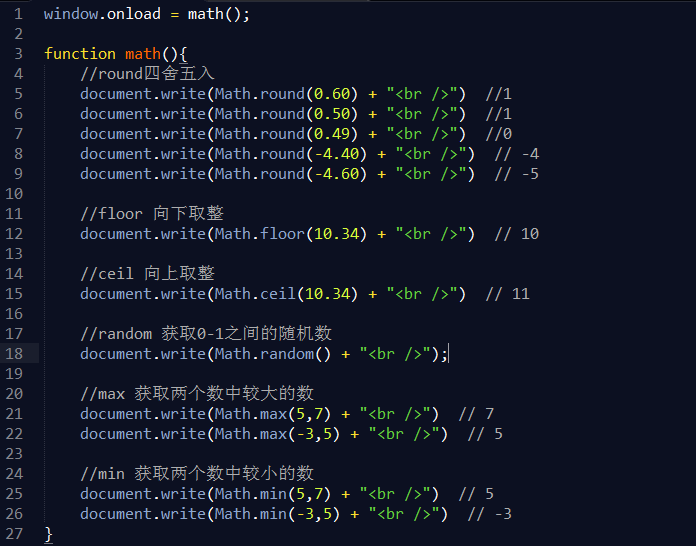
基本计算

math1

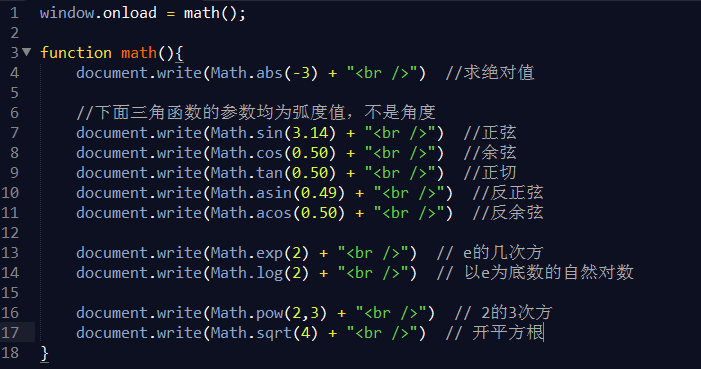
科学计算

math2

实用技巧

  • 快速得出number数组的最大最小值:
1
2
3
4
5
function math(){
var a = [3,1,2,6];
var max = Math.max.apply(Math,a);
var min = Math.min.apply(Math,a);
}
  • 获取n-m之间的随机数(包含n和m)
1
2
3
function math(){
var num = Math.floor(Math.random()*m + n);
}

javascript 数组操作总结

发表于 2015-10-27 | 分类于 Web |

引言

  • 数组是javascript中的重要数据结构,可以存储各种数据类型,有很多重要的操作必须牢记;
  • 本文系统总结了javascript数组的各种常见操作,欢迎补充!

javascript数组需要掌握的方法

  • push、pop
  • shift、unshift
  • splice、slice
  • concat、join、sort、reverse
  • 这些方法在下面会详细介绍

数组的定义

1
2
3
4
5
6
7
8
9
10
11
12
13
14
15
16
17
18
//方法一,定义后赋值
var arr = new Array();
arr[0] = 123
arr[1] = "abc"
arr[5] = false
alert(arr[3]) //undefined

//方法二,定义数组长度
var arr2 = new Array(2);

arr2[0] = "ddd";
arr2[1] = 123;
arr2[4] = false; //数组长度自动扩展

//方法三,定义时赋值
var arr3 = new Array(true,123,"aaa");

//方法四,直接赋值
var arr4 = ["aaa",111,false];

数组的判断

1
2
3
4
5
var arr = new Array();

Array.isArray(arr); //true
arr instanceof Array; //true
arr.constructor === Array; //true

数组元素的合并

1
2
3
var arr = ['c','b','d'];
document.write(arr.join()); //c,b,d
document.write(arr.join(".")); //c.b.d

数组的属性

  • length属性
1
2
3
4
var arr = ['c','b','d'];
alert(arr.length); //3
arr.length = 10; // 数组自动扩展
arr.length = 2; //arr[2]丢失
  • prototype属性
1
2
3
4
5
6
7
8
9
10
11
12
13
14
function max(){
var i,
max = this[0];
for(i=1; i<this.length; i++){
if(max<this[i]){
max = this[i];
}
}
return max;
}

Array.prototype.max = max;
var x = new Array(1,3,2,4,3,5);
alert(x.max()); // 5

数组常见操作

  • 添加元素
1
2
3
4
var arr = [1,2,"aaa",false];
arr.push(3); //添加到末尾
arr.unshift('c'); //添加到开头,其余元素后移
arr.splice(1,0,'d'); //插入到数组下表为1的位置,并且有0个元素被吃掉
  • 删除元素
1
2
3
4
5
var arr = [1,2,"aaa",false];
arr.pop(); //移除最后一个元素
arr.shift(); //移除最前面的元素并返回该元素的值
arr.splice(1,1); //移除下标为1开始的1个元素
delete arr[2]; //移除下标为2的元素
  • 移除特定元素
1
2
3
4
5
6
7
8
var arr = ['a','b','c','d'];
var index = null;
for(var i =0; i<arr.length; i++){
if(arr[i]=='c'){
index = i;
}

}
arr.splice(index,1);
  • 截取数组
1
2
var arr = ['a','b','c','d','e'];
arr.slice(1,3); // ['b','c']
  • 连接数组
1
2
3
var arr = ['a','b','c','d','e'];
var arr2 = ['f','g'];
arr.concat(arr2); // ['a','b','c','d','e','f','g']
  • 拷贝数组
1
2
var arr = ['a','b','c','d','e'];
var arr2 = arr.concat();
  • 数组排序
1
2
var arr = ['e','b','a','d','c'];
alert(arr.sort()); // a b c d e
  • 数组倒序
1
2
var arr = ['e','b','a','d','c'];
alert(arr.reverse()); // e d c b a
  • 判断数组是否包含特定值
1
2
3
var arr = ['e','b','a','d','c'];
alert(arr.indexOf('d')); // 3
alert(arr.indexOf('g')); // -1
  • 求number数组最大最小值
1
2
3
4
5
function math(){
var a = [3,1,2,6];
var max = Math.max.apply(Math,a);
var min = Math.min.apply(Math,a);
}

数组去重

  • 方法一:
    • 利用数组的indexOf方法
1
2
3
4
5
6
7
8
function unique (arr) {
var result = [];
for (var i = 0; i < arr.length; i++)
{
if (result.indexOf(arr[i]) == -1) result.push(arr[i]);
}
return result;
}
  • 方法二:
    • 利用hash表
    • 可能会出现字符串和数字一样的话出错,如var a = [1, 2, 3, 4, ‘3’, 5],会返回[1, 2, 3, 4, 5]
1
2
3
4
5
6
7
8
9
10
11
12
13
function unique (arr)
{
var hash = {},result = [];
for(var i = 0; i < arr.length; i++)
{
if (!hash[arr[i]])
{
hash[arr[i]] = true;
result.push(arr[i]);
}
}
return result;
}
  • 方法三:
    • 排序后比较相邻,如果一样则放弃,否则加入到result
    • 会出现与方法2一样的问题,如果数组中存在1,1,’1’这样的情况,则会排错
1
2
3
4
5
6
7
8
9
10
function unique (arr) {
arr.sort();
var result=[arr[0]];
for(var i = 1; i < arr.length; i++){
if( arr[i] !== arr[i-1]) {
result.push(arr[i]);
}
}
return result;
}
  • 方法四:
    • 最简单但是效率最低的算法,也不会出现方法2和方法3出现的bug
1
2
3
4
5
6
7
8
9
10
11
12
13
14
15
16
function unique (arr) {
if(arr.length == 0) return;
var result = [arr[0]], isRepeate;
for( var i = 0, j = arr.length; i < j; i++ ){
isRepeate = false;
for( var k = 0, h = result.length; k < h; k++){
if(result[k] === arr[i]){
isRepeate = true;
break;
}
if(k == h) break;
}
if( !isRepeate ) result.push(arr[i]);
}
return result;
}

数组随机扰乱

  • 方法一:
    • 每次随机抽一个数并移动到新数组中
1
2
3
4
5
6
7
8
9
10
11
12
13
14
15
16
function shuffle(array) {
var copy = [],
n = array.length,
i;
// 如果还剩有元素则继续。。。
while (n) {
// 随机抽取一个元素
i = Math.floor(Math.random() * array.length);
// 如果这个元素之前没有被选中过。。
if (i in array) {
copy.push(array[i]);
delete array[i];
n--;
}
}
}
  • 方法二:
    • 跟方法1类似,只不过通过splice来去掉原数组已选项
1
2
3
4
5
6
7
8
9
10
11
12
13
function shuffle(array) {
var copy = [],
n = array.length,
i;
// 如果还剩有元素。。
while (n) {
// 随机选取一个元素
i = Math.floor(Math.random() * n--);
// 移动到新数组中
copy.push(array.splice(i, 1)[0]);
}
return copy;
}
  • 方法三:
    • 前面随机抽数依次跟末尾的数交换,后面依次前移
    • 即:第一次前n个数随机抽一个跟第n个交换,第二次前n-1个数跟第n-1个交换,依次类推
1
2
3
4
5
6
7
8
9
10
11
12
13
14
function shuffle(array) {
var m = array.length,
t, i;
// 如果还剩有元素…
while (m) {
// 随机选取一个元素…
i = Math.floor(Math.random() * m--);
// 与当前元素进行交换
t = array[m];
array[m] = array[i];
array[i] = t;
}
return array;
}

数组间操作

  • 数组求交集
1
2
3
4
//利用filter和数组自带的indexOf方法
array1.filter(function(n) {
return array2.indexOf(n) != -1
});
  • 数组求并集
1
2
3
4
5
6
7
8
9
10
11
//方法原理:连接两个数组并去重
function arrayUnique(array) {
var a = array.concat();
for(var i=0; i<a.length; ++i) {
for(var j=i+1; j<a.length; ++j) {
if(a[i] === a[j])
a.splice(j--, 1);
}

}
return a;

};
  • 数组求差集
1
2
3
4
//利用filter和indexOf方法
Array.prototype.diff = function(a) {
return this.filter(function(i) {return a.indexOf(i) < 0;});
};
1…678…11
Eric Chang

Eric Chang

www.yinshuisiyuan.net

101 日志
15 分类
51 标签
github weibo linkedin mail
  • 阮一峰
  • Azure
  • Python
  • Nodejs
© 2015 - 2020 Eric Chang
由 Hexo 强力驱动
主题 - NexT.Pisces


知识共享许可协议本作品采用知识共享署名-非商业性使用 4.0 国际许可协议进行许可。